如何設置VIM中C/C++開發環境

1、配置文件的位置
在目录 /etc/ 下面,有个名为vimrc的文件,这是系统中公共的vim配置文件,对所有用户都有效。而在每个用户的主目录下,都可以自己建立私有的配置文件,命名为:.vimrc。例如,/root目录下,通常已经存在一个.vimrc文件。
2、设置语法高亮显示
1) 打开vimrc,添加以下语句来使得语法高亮显示:
syntax on
2) 如果此时语法还是没有高亮显示,那么在/etc目录下的profile文件中添加以下语句:
export TERM=xterm-color
3、设置Windows风格的C/C++自动缩进(添加以下set语句到vimrc中)
1设置(软)制表符宽度为4
set tabstop=4
set softtabstop=4
2设置缩进的空格数为4
set shiftwidth=4
3设置自动缩进即每行的缩进值与上一行相等;使用 noautoindent 取消设置:
set autoindent
4设置使用 C/C++ 语言的自动缩进方式:
set cindent
5)设置C/C++语言的具体缩进方式(以我的windows风格为例):
set cinoptions={0,1s,t0,n-2,p2s,(03s,=.5s,>1s,=1s,:1s
6)如果想在左侧显示文本的行号,可以用以下语句:
set nu
7)最后,如果没有下列语句,就加上吧:
if &term=="xterm"
set t_Co=8
set t_Sb=^[[4%dm
set t_Sf=^[[3%dm
endif

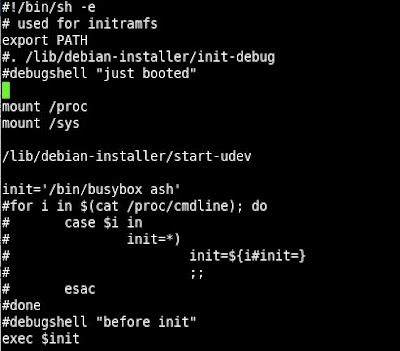
How to create lightweight linux in your pocket!

1. Create environment that can build BusyBox
$apt-get install gcc
$apt-get install linux-headers-`uname -r`
$apt-get install make
$apt-get install build-essential
$apt-get install libncurses5-dev
=====================================================
2. download Xubuntu installer initrd
=====================================================
3. Decompression initrd
$gunzip initrd.img.gz
$mkdir test
$cd test
$cpio -i -d < ../init.img
=====================================================
4. Revised init content shows as follows
$cd /
$vim ./init


~~~~~~~~~~~~~~~~~~~~~~~~~~~~~~~~
How to program script for fdisk command?
> fdisk_command.sh
#!/bin/sh -e
fdisk /dev/sda < /script.sh
> script.sh
#!/bin/sh -e
n
p
1
t
83
w
~~~~~~~~~~~~~~~~~~~~~~~~~~~~~~~~


// Disable kernel's message
$echo "0 0 0 0" > /proc/sys/kernel/printfk
// Remove message of fdisk command to trash
$./fdisk_command.sh > /dev/null
// Modify fdisk source code to remove title message

=====================================================
5. download Xubuntu installer busybox 1.1.3

6. Build BusyBox kernel
$make allnoconfig
$make menuconfig
Busybox Setting
Build Options
[*]Build BusyBox as a static binary (no shared libs)
[*]Build with Large File Support (for accessing files > 2GB)
Installation Options -> [*]Don't use /usr
Miscellaneous Utilities -> Don't choose
Shells -> default (ash)
Others setting can be chosen by oneself
Save Configuration to an Alternate file

$make
$make install
$cp -ar ./_install/* /home/gary/myinitrd/test/
$cd /home/gary/myinitrd/test
=====================================================
Compression
$find .| cpio -o -H newc > ../myinitrd.img
$cd ..
$ gzip -9 myinitrd.img

How to install GStreamer and programming on ubuntu


  • apt-get install build-essential
    很顯然,我們需要編譯 C/C++ 應用程式
  • apt-get install libgtk2.0-dev
    主題是 Gtk+,當然要安裝其對應的開發套件
  • apt-get install libwebkit-dev
    依據 debian 描述,該套件為 "Web content engine library for Gtk+",注意,Qt 4.4 之後,也切割了 libqt4-webkit,表示 WebKit module for Qt,不要弄混淆了
  • apt-get install gstreamer0.10-x gstreamer0.10-tools gstreamer0.10-ffmpeg gstreamer0.10-plugins-base gstreamer0.10-plugins-good gnome-media

Step 1: Install GStreamer 0.10.23
$apt-get install gstreamer*
$apt-get install libglib2.0-dev
$apt-get install bison
$apt-get install flex
$mkdir /home/gary/gstreamer
$cd /home/gary/gstreamer
$wget ./ http://gstreamer.freedesktop.org/src/gstreamer/gstreamer-0.10.23.tar.gz
$tar -zxvf ./gstreamer-0.10.23.tar.gz
$cd ./gstreamer-0.10.23
$./configure
$make
$make install


Reference:
http://www.ibm.com/developerworks/cn/linux/l-gstreamer/index.html
http://hi.baidu.com/369109971/blog/item/726a6ad4d005fb06a18bb75f.html

How to install DSPACK in BCB2007

Step 1: 下載direct 9 SDK 2004年12月的版本才安裝成功

http://download.microsoft.com/download/f/6/0/f6087536-6544-47c7-9ca8-efdcc18feb57/dxsdk_dec2004.exe

Step 2: 下載Dspack
http://delphi.ktop.com.tw/board.php?cid=31&fid=97&tid=92986

Step 3:
將Dspack解壓縮到C:\,
到C:\DSPACK\packages依"次序"安裝以下的package
DirectX9_BCB6.bpk   執行compile後儲存
DSPack_BCB6.bpk    執行compile後儲存
DSPackDesign_BCB6.bpk 執行install後儲存

Step 4:
Copy $DXSDK\include\*.* to $DSPACK\include\*.*
Copy $DSPACK\include\*.* to $BDS\include\*.*


[單車耐力賽] 土城 <-> 野柳 達成

太高興了,從來也沒想過,我可以一個人獨立完成 
土城 <-> 野柳 一日來回,不過,忘記考慮到日曬問題,
使我變的像黑白郎君一樣,下次真的要注意~

2009/5/23 
7:30 AM 
吃完拉亞漢堡-總匯土司後,背上自己的裝備,
開始迎向今天的挑戰 土城-野柳 一日來回,
總里程數156km,附上我行經的路線圖好了,


我騎捷安特入門款的登山車DS-521,還算蠻重的,
為了要習慣這台車,連續兩個禮拜都去承天禪寺夜騎,
訓練自己的腳力與耐力,好好應付這次的挑戰~PS:也為了減肥^^


首先越過河堤來到土城河岸腳踏車步道,
選擇走華江橋 -> 大稻埕 -> 關渡 -> 紅樹林捷運站,
時速都維持在20~25km之間,
一路上蠻多人也在騎,我一點都不孤單,


終於來到第一個挑戰"登輝大道",
此路段最難的只有前面三個緩升波段,
咬著牙,硬ㄍㄧㄣ過去~


大約9:30左右到了聖約翰技術學院(舊稱:新埔工專),我母校啦,
其實心裡有一種念頭,告訴自己幹麻這們累ㄚ,
不過換個角度想,既然都衝到這裡,時間也才9點多,
不如乾脆在騎下去看看好了,
因此就繼續踏上這段旅程摟~

沿途經過了~屯山國小

淺水灣

白沙灣

石門鄉富基村活動中心

非常有名的劉家肉粽,超多人的啦

石門洞

十八王公廟

超大電風扇 (風力發電)

金包里老街

總算到了終點 - 野柳地質公園
時間也差不多12點整了~


小小休息15分鐘,準備要折返土城唷~
騎回家時間差不多下午5點半左右,
非常充實一日旅程喔~

後記:
騎在北海岸的路上,還蠻多人替我加油喔,
雖然我已經上氣不接下氣了,
不過還是感謝那些陌生人的鼓勵唷~


BCB2007 簡易透明圖顯示方法 - 加載GIF

TGIFImage *pGIF = NULL;
TTimer* Timer1 = NULL;
int FrameCount = 0;
void __fastcall Timer1Timer(TObject *Sender);
__fastcall TForm1::TForm1(TComponent* Owner)
: TForm(Owner)
{
DoubleBuffered = true;
Timer1 = new TTimer(Form1);
Timer1->Enable = false;
Timer1->OnTimer = Timer1Timer;
pGIF = new TGIFImage;
pGIF->LoadFromFile("1.gif");
Timer1->Interval = 200;
Timer1->Enable = true;
}
void __fastcall Timer1Timer(TObject *Sender){
Repaint();
}
void __fastcall TForm1::FormPaint(TObject *Sender){
Canvas->Lock();
Graphics::TBitmap *bmp = new Graphics::TBitmap;
try{
bmp->Assign(aGIF->Images->operator [](i)->Bitmap);
bmp->Transparent = true;
bmp->TransparentColor = clBlack;
bmp->PixelFormat = pf24bit;
// SetStretchBltMode(Canvas->Handle ,STRETCH_DELETESCANS);
// Canvas->StretchDraw(TRect(0,0,100,100),bmp);
Canvas->Draw(0,0,bmp);
}catch(...){
ShowMessage("Can't display!");
}
delete bmp;
if(++ FrameCount >= pGIF->Images->Count)
FrameCount = 0;
Canvas->Unlock();
}
void __fastcall TForm1::FormDestroy(TObject *Sender)
{
delete Timer1;
delete pGIF;
}

How to use TGIFImage in BCB2007

I provide two kinds of methods to implement.

1. Image1->Picture->LoadFromFile("test.gif");
TGIFImage * pGif = dynamic_cast (Image1->Picture->Graphic);
if( pGif != NULL )
pGif ->Animate = true;

2. TGIFImage * pGif = new TGIFImage;
pGif ->LoadFromFile("test.gif");
pGif ->Animate = true;
TPaintBox *paintbox1 = new TPaintBox(Form1);
paintbox1->parent = Form1;
paintbox1->Draw(0,0, pGif );


Objective-C 學習手冊

1. 函數宣告
// C code:
void hello(bool bFlag)
{
// OOXXOOXX
}

// OBJ-C code:
// '+' 表示其他函數可以直接調用這個類別中的這個函數,
// 而不需要創建這個類別的實作.
// '-' 表示一個函數,方法,或者消息的開始
-(void)hello:(BOOL)bFlag
{
// OOXXOOXX
}

2. 調用方式
// C code:
hello(true);

// C++ code:
this.hello(true);

// OBJ-C code
[self hello:YES];

3. NS****
老喬當年被人擠兌出蘋果,
自立門戶的時候做了個公司叫做NextStep,
裏麵這一整套開發包很是讓一些科學家們喜歡,
而現在Mac OS用的就是NextStep這一套函數庫。

這些開發NextStep的人們比較自戀地把函數庫裡面
所有的類都用NextStep的縮寫打頭命名,
也就是NS****了。比較常見的比如:

NSLog

NSString

NSInteger

NSURL

NSImage


你會經常看到一些教學裏麵會用到:

NSLog (@"%d",myInt);

這句話主要是在console裏麵跟蹤使用,

你會在console裏麵看到myInt的值

(在XCode裏麵運行的時候打開dbg窗口即可看到)。

而我們在其他開發環境裏麵可能會比較習慣使用MessageBox這種方式進行調試。

你還可以看到其他名字打頭的一些類,

比如CF、CA、CG、UI等等,比如

CFStringTokenizer 這是個分詞的東東

CALayer 這表示Core Animation的層

CGPoint 這表示一個點

UIImage 這表示iPhone裏麵的圖片

CF說的是Core Foundation,

CA說的是Core Animation,

CG說的是Core Graphics,

UI說的是iPhone的User Interface……


4. #import 雷同於 #include

5. @interface


How to write InstallLocation infomation in Registry when using VS2005 Deployment Project

Step1: open msi in Orca.

Step2: Select Transform / New Transform

Step3: Create new row in CustomAction table.
{Action} SetInstallLocation
{Type} 51
{Source} ARPINSTALLLOCATION
{Target} [TARGETDIR]

Step4: then add a new row to the InstallExecuteSequence table
{Action} SetInstallLocation
{Condition} ARPINSTALLLOCATION=""
{Sequence} 798
Step5: Once everything is entered,
select Generate Transform from the Transform menu,
and save the file(Filename is AddInstallLocation.mst).

Step6: Now apply that transform from the command line
using MsiTran.exe (in Windows SDK).
This can be added to the PostBuildEvent:

"C:\Program Files\Windows Installer 4.5 SDK\TOOLS\msitran" -a "$(ProjectDir)AddInstallLocation.mst" "$(BuiltOuputPath)"

虹光大成就-密教灌頂(一)