This post is meant to be a little guide to setting up Vim (or MacVim) as your next favorite C/C++ IDE. Vim is probably the most powerful text editor that humans have ever created, so you should consider using it even if its learning curve is a bit steep.
MacVim
First, let’s install MacVim. MacVim adds a graphical interface to Vim that can help newcomers (only for OSX users, others should consider GVim). Skip the next steps if you want to use the regular Vim instead.
- Get the latest snapshot of MacVim from here (make sure you have the correct OSX version).
- Decompress it (double click) and drag MacVim.app to your Applications folder.
- Open the Terminal (commonly located in /Applications/Utilities/Terminal.app, but I suggest you put it in your Dock) and go to the MacVim Snapshot folder you just downloaded. In my case, I had to type the following:
cd ~/Downloads/MacVim-snapshot-73/ - Copy the
mvimbinary to your PATH so that you can open MacVim from any directory in your computer. Like this (you will have to enter your machine password):sudo cp mvim /usr/bin - Now you should be able to start a new document with MacVim by typing:
mvim hello.c
(Type:wto quit).
.vimrc
Now that you have Vim (and/or MacVim) installed in your system, the next thing you should do is to set it up to adapt it to your needs. The rest of the instructions work for Vim and MacVim, so I will use Vim to refer to both (simply replace
vim for mvim if you want to use MacVim). Vim is highly configurable, but here I will describe what I believe is the most useful setup for new users and C/C++ developers.
The Vim (or MacVim) configuration file is located in
~/.vimrc. Therefore, type vim ~/.vimrc to start editing your configuration. You might see a blank file if you have never edited Vim’s configuration before. You can copy and paste the following. There’s a comment for the most important commands, so that you can understand what these lines do if you are interested.
1
2
3
4
5
6
7
8
9
10
11
12
13
14
15
16
17
18
19
20
21
22
23
24
25
26
27
28
29
30
31
32
33
34
35
36
37
38
39
40
41
42
43
44
45
46
47
48
49
50
51
52
53
54
55
56
57
58
59
60
61
62
63
64
65
66
67
68
69
70
71
72
73
74
75
76
77
78
79
80
81
82
83
84
85
86
87
88
89
90
91
92
93
94
95
96
97
98
99
100
101
102
103
104
105
106
107
108
109
| " Enables highlight syntaxsyntax enableset nofoldenable" Sweet colorscheme" colorscheme codeschoolset background=dark" Set utf8 as standard encoding and en_US as the standard languageset encoding=utf-8"" Display line numbers on the leftset number"" Use mouse (only for resizing!)set mouse=a" Set the focus to the correct screen (ok, no more mouse thingies)set mousefocus" No more annoying soundsset visualbell" Do not scroll sideways unless we reach the end of the screenset sidescrolloff=0" highlight the status bar when in insert modeif version >= 700 if has("gui_running") au InsertEnter * hi StatusLine guifg=black guibg=green au InsertLeave * hi StatusLine guibg=black guifg=grey else au InsertEnter * hi StatusLine ctermfg=235 ctermbg=2 au InsertLeave * hi StatusLine ctermbg=240 ctermfg=12 endifendif" Infere the case-sensitivityset infercase" Need to set this flag on in order to have many cool features onset nocompatible" Indent properly based on the current filefiletype indent plugin onfiletype plugin on" Pathogen load"filetype off " Makes syntax non-working on office boxcall pathogen#infect()call pathogen#helptags()" Switch between files in buffernnoremap nnoremap " Change default fontsize to fit MacBook Pro 13'set guifont=Monaco:h11" Don't select first Omni-completion optionset completeopt=longest,menuone"set completeopt=menuone,longest,previewset tabstop=4 " a tab is four spacesset backspace=indent,eol,start " allow backspacing over everything in insert modeset autoindent " always set autoindenting onset copyindent " copy the previous indentation on autoindentingset shiftwidth=4 " number of spaces to use for autoindentingset shiftround " use multiple of shiftwidth when indenting with '<' and '>'set incsearch " show search matches as you typeset expandtabset shiftwidth=4set softtabstop=4" Always set the current file directory as the local current directoryautocmd BufEnter * silent! lcd %:p:h" Enable foldingnnoremap "\vnoremap set history=1000 " remember more commands and search historyset undolevels=1000 " use many levels of undo" Tabs in command line mode behave like bashset wildmode=longest,list,fullset wildmenu" Highlight the entire word when searching for itset hlsearch"====[ Make tabs, trailing whitespace, and non-breaking spaces visible ]======exec "set listchars=tab:\uBB\uBB,trail:\uB7,nbsp:~"set list" Move line by line even when the line is wrappedmap j gjmap k gk" Persistent undoset undofile " Save undo's after file closesset undodir=$HOME/.vim/undo " where to save undo historiesset undolevels=1000 " How many undosset undoreload=10000 " number of lines to save for undo" YouCompleteMelet g:ycm_global_ycm_extra_conf = "~/.vim/bundle/YouCompleteMe/.ycm_extra_conf.py"nnoremap |
Plugins
Now it’s time to install some plugins. We will start with Pathogen, a script to make the installation of other scripts extremely easy. To install Pathogen, just type:
mkdir -p ~/.vim/autoload ~/.vim/bundle
curl https://raw.githubusercontent.com/tpope/vim-pathogen/master/autoload/pathogen.vim > ~/.vim/autoload/pathogen.vim
Using Pathogen, we will install Syntastic, a wonderful plugin to identify errors in your code (linting) in the most popular programming languages. To install it, just type:
cd ~/.vim/bundle && \
git clone https://github.com/scrooloose/syntastic.git
Now restart Vim and type
:Helptags. Linting should be working now for C/C++.
The next plugin to install is MiniBufExplorer, which will make our life easier when dealing with multiple files in Vim. To install it, simply type:
cd ~/.vim/bundle && \
git clone https://github.com/fholgado/minibufexpl.vim.git
We also want to have some auto complete options when developing our C/C++ programs. The best plugin I’ve found is called YouCompleteMe, which is compatible with basically all the most popular programming languages to date. Type the following to install it:
cd ~/.vim/bundle && \
git clone https://github.com/Valloric/YouCompleteMe.git
cd YouCompleteMe
git submodule update --init --recursive
./install.sh --clang-completer
Note: You might need to install Homebrew to install YouCompleteMe. To install it, type:
ruby -e "$(curl -fsSL https://raw.github.com/Homebrew/homebrew/go/install)"
You will need to do some additional setup in order to get the plugin working. As you may see in the second to last line of the
.vimrc above, we set up the default configuration file in ~/.vim/bundle/YouCompleteMe/.ycm_extra_conf.py. You can simply copy my .ymc_extra_conf.py in this folder. To do so, simply type:curl http://urinieto.com/drop/.ycm_extra_conf.py > ~/.vim/bundle/YouCompleteMe/.ycm_extra_conf.py
Finally, the last plugin to install is the C Plugin, which will help us when navigating through C/C++ files, debugging, etc. This plugin does not support Pathogen installation, so we will have to do it manually. Go to the official plugin page: http://www.vim.org/scripts/script.php?script_id=213 and download the latest
cvim.zip. Copy the zip file to your ~/.vim/folder and type:unzip cvim.zip
Before we are done, you should configure the template file with your name and affiliation. To do so, edit the template file and edit the user macros, like this:
vim ~/.vim/c-support/templates/Templates
My User Macros look like this:
§ ==========================================================
§ User Macros
§ ==========================================================
SetMacro( 'AUTHOR', 'Oriol Nieto' )
SetMacro( 'AUTHORREF', '' )
SetMacro( 'COMPANY', 'New York University' )
SetMacro( 'COPYRIGHT', '' )
SetMacro( 'EMAIL', 'oriol@nyu.edu' )
SetMacro( 'LICENSE', '' )
SetMacro( 'ORGANIZATION','New York University' )
If you’ve done everything correctly, you will be able to create a new .c file (e.g.
vim hello.c and a nice template will be included in the top of the file. Moreover, you should be able to open multiple files (e.g. :e otherfile.c) and they will appear in the MiniBufferExplorer. And finally, if you make some errors while coding, Syntastic will tell you. As an example, see the following screenshot: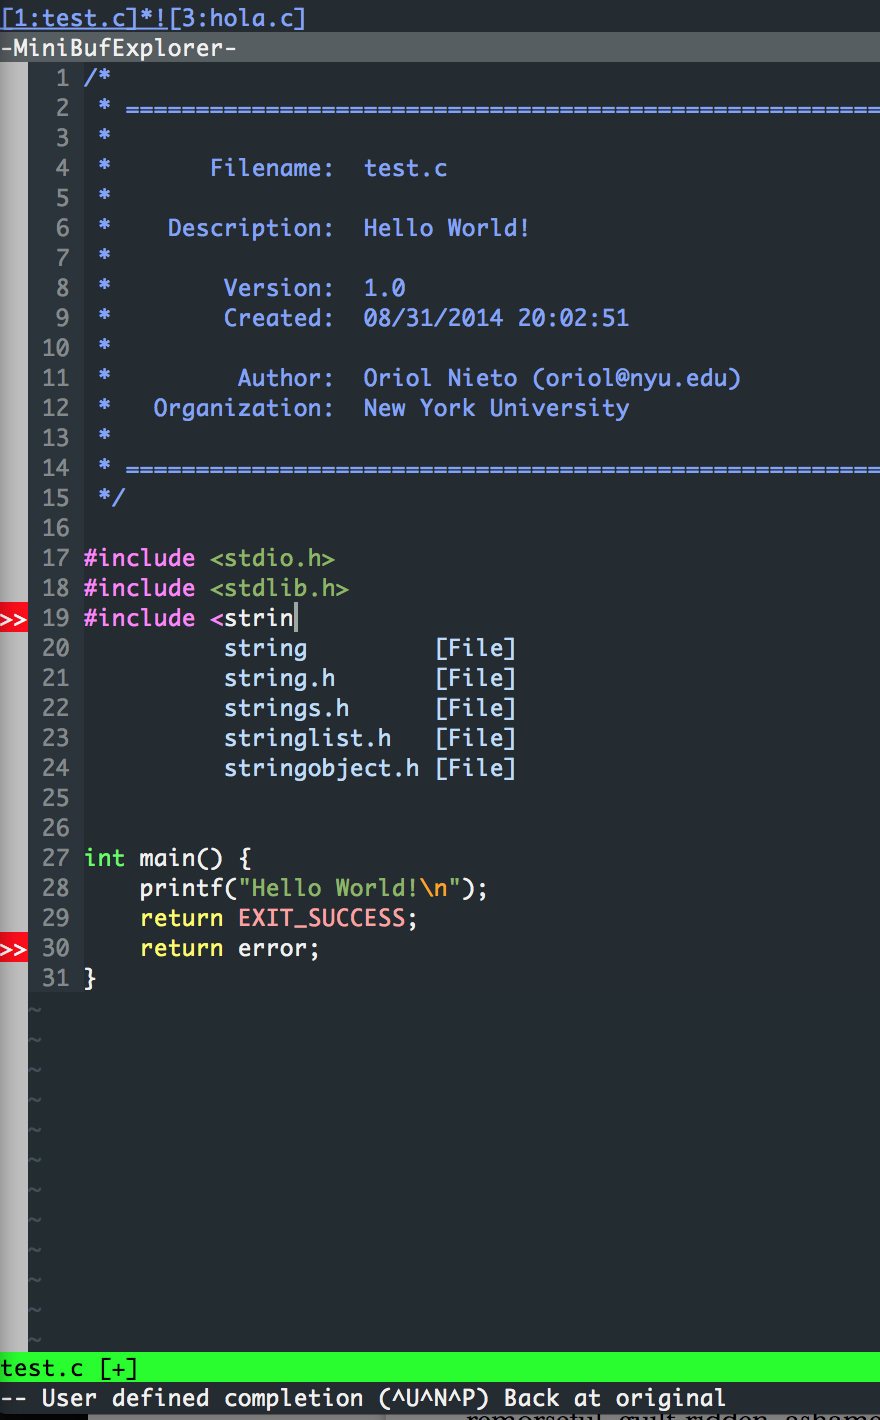
MacVim with the following plugins: Syntastic, YouCompleteMe, C.vim, and MiniBufExplorer
Please, let me know if you have any questions. I hope you enjoy your new IDE!


